A few pictures from Christmas this year.
Home
Wedding Song Art
I pin a lot of things on Pinterest that maybe, one day, in the near future, I’ll get around to trying. But when I stumbled across this awesome idea on Pinterest, I headed out right away to get the supplies I needed to make it. Turn a song into art. What a great idea!
First, you need sheet music. Any sheet music will do, but obviously, if the song has some sentimental meaning to you, that will be even better. I chose our wedding song, Into the Mystic by Van Morrison. Just google “(your song title) sheet music” and tons of sites will come up. You are going to HAVE to pay for this, unless you already own the sheet music. Suck it up. It cost me $4.95 to download this music and print it off. Be sure to save a PDF of your music. If your printer starts (oh, I don’t know…) acting up while you are printing, you are going to be pretty pissed off, because unless you save it as a PDF, you only have one shot to print it off.
Next, determine what size you want your print to be. I decided I wanted it BIG, so I bought a 24″x30″ canvas. Keep in mind that you will want to use a standard size canvas, so that finding a frame is easy. If you use a strange size, you are going to have to get this custom-framed, and if you’ve never done that, it can be very expensive. My canvas was $19.99 at Hobby Lobby, but was on sale for 50% off!
You’ll also need an open-backed frame to hold your finished art. Hobby Lobby has a great selection of these frames in their 80% off section, but most of these are odd sizes, so finding a canvas to fit might be difficult. They have a huge selection in their frame department, and they are almost always 50% off. Seriously, does anyone buy anything from Hobby Lobby that isn’t 50% off? I also checked Michaels, which also had a sale, but their selection of frames was nowhere near as good as Hobby Lobby’s. The frame I selected was $64.99, on sale for 50% off!
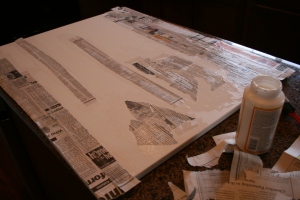
Now the fun begins! Rip a newspaper into long, thin strips. Mod Podge dries quickly, so work in one small space at a time. Spread your Mod Podge on to the canvas using your paint brush and lay the newspaper strips down in overlapping pieces. Work randomly, instead of going straight down the canvas. Put a piece here, a piece there, until your canvas is covered. You will see that the newspaper will start to bubble up in some places and that is the look you are going for. The point of this step is to give your canvas a bit of texture. Your hands will get messy, so just get used to it!
At this point, with my canvas completely covered with newspaper, Henry announced that my artwork was “beautiful.” I seriously have to question that kid’s artistic opinion. Steven, on the other hand, stared at it skeptically and said “I don’t really get how *this* is supposed to be art.” Critic. Once the canvas is dry, cover it with a layer of white paint. This step is optional. The original poster didn’t paint over hers, but I didn’t want to risk being able to see the newspaper through the final product. I had some leftover white paint from painting a piece of furniture. Really any light color will work.
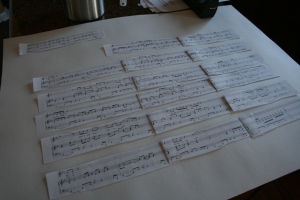
Now comes the annoying fun part. Cut your sheet music up and line it up how you want. Tape them down to a large sheet of paper. You are going to find that they don’t line up correctly, that some bars are lighter than others, and a million other annoying things. If you are even remotely anal-retentive, you are in for a rough day. Just go with it. This really shouldn’t be that difficult, but I found this to be the most annoying part of this project. Once I accepted the fact that this wasn’t going to be perfect, I was (sort of) fine. You don’t have to use all the bars of music. I cut a lot out of mine to make it fit on the canvas, but I really wanted the lyrics to be included.
Now is the part I was really dreading. Take your taped up sheet music to a copy center and get it enlarged to fit your canvas. If you read the comments of the original creator of this art, there were a lot of people who were turned away from their copy center because they aren’t allowed to copy sheet music. Fortunately for me, my copy center apparently didn’t care about copyright infringement, and had no problem enlarging mine. I won’t even get into how many copies I had to make to get this the right size, but luckily I only had to pay for the one sheet I needed. Mine was enlarged 120% and it cost $9.72. If you do encounter issues making a copy, I also found this idea which is the same thing, only using the lyrics, instead of the sheet music. It’s just as awesome, and I really like how it is split into nine square frames instead of one large one.
Unfortunately, when I got home, I realized that while the sheet music was the right size to cover my canvas, the paper it was printed on was not. I used one of the mistake copies I made (the copy center let me take them home since I said the boys would draw on them) that was very large and would fit the canvas completely. So, I had to do the next step twice, but if your paper is big enough, you’ll only need to do it once.
Now, some fun: antiquing your paper. Soak a tea-bag in a small bowl of water. Lay some parchment or wax paper down on whatever surface you are using (you don’t want your wet paper sticking to the counters and tearing!) and use the tea bag to “paint” your paper. I also added some coffee to the tea-water, because I didn’t like how light the tea-water was. There is nothing scientific about this…just have fun. You can use a hair-dryer to speed up the drying process and if it’s still too light, you can paint over it a second time.
Once your paper is completely dry, it’s time to glue it to your canvas. The paper should be dry and crinkly. This isn’t difficult, but it does require your full attention and you’ll have to move (sort of) quickly so that the paper doesn’t dry. I used a large sponge paint brush to be able to spread the mod podge quickly. I found that I could (gently) pull the paper up and reposition it if it got too wrinkly. Wrinkles are ok, but air bubbles are not, so be sure to work out any air bubbles as soon as you see them. Be careful not to poke holes in your paper. Again, it’s not rocket science, but it takes a bit of elbow grease. Once the paper is glued onto the canvas, mod podge over the entire sheet music to protect it.
Remember how I said my final printed sheet music was too small to fit on the canvas? The picture above is the larger sheet (that did fit the canvas). I “antiqued” just the border, leaving the center alone, since it would be covered up. This sheet got HUGE air bubbles in the middle, and my edges had already dried, so I couldn’t pull up the corners to let the air out. Don’t let this happen to your sheet music paper, or it will be ruined! Since this was going under the sheet music, I just poked a hole in the bubble and mod-podged the shit out of it. I was much more careful with the sheet music piece of paper.
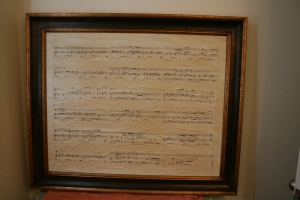
Now take your finished ART to get it framed. If you bought the frame from Hobby Lobby, they will frame it for FREE! I only had to pay $1.00 for the hanger wire. (Michael’s told me there was a fee for using their framing department, even if you bought the frame there.) I picked a pretty extravagant frame for this, considering I’m usually a simple black-frame sort of gal, but I think it looks perfect with this. It will now hang proudly in our powder room, so any time someone is using our bathroom, they have a little reading material, and a great song is guaranteed to be stuck in their head while they are doing their business.
Materials list:
printed sheet music
canvas
Matte Mod Podge (I used almost the entire 16 oz jar)
newspaper, ripped into thin strips
sponge paint brush (I used one large and one small)
light colored paint (optional)
open-backed frame
I found this idea on Pinterest from Scout & Nimble. If my instructions aren’t clear enough, be sure to check her website too. Her wedding song was also a Van Morrison song, and she also has a son named Henry. And now that I look at her site again, it looks like I bought the same frame as she did! Imitation is the sincerest form of flattery, right?


