Monthly Archives: February 2012

Wedding Song Art

I pin a lot of things on Pinterest that maybe, one day, in the near future, I’ll get around to trying.  But when I stumbled across this awesome idea on Pinterest, I headed out right away to get the supplies I needed to make it.  Turn a song into art.  What a great idea!

Click on picture to see a close-up of the finished product

First, you need sheet music. Any sheet music will do, but obviously, if the song has some sentimental meaning to you, that will be even better. I chose our wedding song, Into the Mystic by Van Morrison. Just google “(your song title) sheet music” and tons of sites will come up. You are going to HAVE to pay for this, unless you already own the sheet music. Suck it up. It cost me $4.95 to download this music and print it off. Be sure to save a PDF of your music. If your printer starts (oh, I don’t know…) acting up while you are printing, you are going to be pretty pissed off, because unless you save it as a PDF, you only have one shot to print it off.

Next, determine what size you want your print to be. I decided I wanted it BIG, so I bought a 24″x30″ canvas. Keep in mind that you will want to use a standard size canvas, so that finding a frame is easy. If you use a strange size, you are going to have to get this custom-framed, and if you’ve never done that, it can be very expensive. My canvas was $19.99 at Hobby Lobby, but was on sale for 50% off!

You’ll also need an open-backed frame to hold your finished art. Hobby Lobby has a great selection of these frames in their 80% off section, but most of these are odd sizes, so finding a canvas to fit might be difficult. They have a huge selection in their frame department, and they are almost always 50% off. Seriously, does anyone buy anything from Hobby Lobby that isn’t 50% off? I also checked Michaels, which also had a sale, but their selection of frames was nowhere near as good as Hobby Lobby’s. The frame I selected was $64.99, on sale for 50% off!

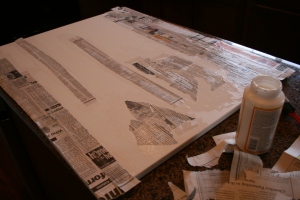
Now the fun begins! Rip a newspaper into long, thin strips. Mod Podge dries quickly, so work in one small space at a time. Spread your Mod Podge on to the canvas using your paint brush and lay the newspaper strips down in overlapping pieces. Work randomly, instead of going straight down the canvas. Put a piece here, a piece there, until your canvas is covered. You will see that the newspaper will start to bubble up in some places and that is the look you are going for. The point of this step is to give your canvas a bit of texture. Your hands will get messy, so just get used to it!

Step 1: Mod Podge newspaper onto your canvas to give it texture

At this point, with my canvas completely covered with newspaper, Henry announced that my artwork was “beautiful.” I seriously have to question that kid’s artistic opinion. Steven, on the other hand, stared at it skeptically and said “I don’t really get how *this* is supposed to be art.” Critic.  Once the canvas is dry, cover it with a layer of white paint.  This step is optional.  The original poster didn’t paint over hers, but I didn’t want to risk being able to see the newspaper through the final product.  I had some leftover white paint from painting a piece of furniture.  Really any light color will work.

Finished "textured" canvas

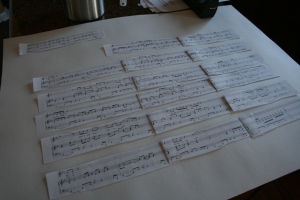
Now comes the annoying fun part. Cut your sheet music up and line it up how you want. Tape them down to a large sheet of paper. You are going to find that they don’t line up correctly, that some bars are lighter than others, and a million other annoying things. If you are even remotely anal-retentive, you are in for a rough day. Just go with it. This really shouldn’t be that difficult, but I found this to be the most annoying part of this project. Once I accepted the fact that this wasn’t going to be perfect, I was (sort of) fine. You don’t have to use all the bars of music. I cut a lot out of mine to make it fit on the canvas, but I really wanted the lyrics to be included.

 Line up sheet music to fit your canvas

Now is the part I was really dreading. Take your taped up sheet music to a copy center and get it enlarged to fit your canvas. If you read the comments of the original creator of this art, there were a lot of people who were turned away from their copy center because they aren’t allowed to copy sheet music. Fortunately for me, my copy center apparently didn’t care about copyright infringement, and had no problem enlarging mine. I won’t even get into how many copies I had to make to get this the right size, but luckily I only had to pay for the one sheet I needed. Mine was enlarged 120% and it cost $9.72. If you do encounter issues making a copy, I also found this idea which is the same thing, only using the lyrics, instead of the sheet music.  It’s just as awesome, and I really like how it is split into nine square frames instead of one large one.

Unfortunately, when I got home, I realized that while the sheet music was the right size to cover my canvas, the paper it was printed on was not. I used one of the mistake copies I made (the copy center let me take them home since I said the boys would draw on them) that was very large and would fit the canvas completely. So, I had to do the next step twice, but if your paper is big enough, you’ll only need to do it once.

Now, some fun: antiquing your paper. Soak a tea-bag in a small bowl of water. Lay some parchment or wax paper down on whatever surface you are using (you don’t want your wet paper sticking to the counters and tearing!) and use the tea bag to “paint” your paper. I also added some coffee to the tea-water, because I didn’t like how light the tea-water was. There is nothing scientific about this…just have fun. You can use a hair-dryer to speed up the drying process and if it’s still too light, you can paint over it a second time.

"Antiquing" your image with a tea-bag

Once your paper is completely dry, it’s time to glue it to your canvas. The paper should be dry and crinkly. This isn’t difficult, but it does require your full attention and you’ll have to move (sort of) quickly so that the paper doesn’t dry. I used a large sponge paint brush to be able to spread the mod podge quickly. I found that I could (gently) pull the paper up and reposition it if it got too wrinkly. Wrinkles are ok, but air bubbles are not, so be sure to work out any air bubbles as soon as you see them. Be careful not to poke holes in your paper. Again, it’s not rocket science, but it takes a bit of elbow grease. Once the paper is glued onto the canvas, mod podge over the entire sheet music to protect it.

Mod podge the antiqued paper to your canvas

Remember how I said my final printed sheet music was too small to fit on the canvas? The picture above is the larger sheet (that did fit the canvas). I “antiqued” just the border, leaving the center alone, since it would be covered up. This sheet got HUGE air bubbles in the middle, and my edges had already dried, so I couldn’t pull up the corners to let the air out. Don’t let this happen to your sheet music paper, or it will be ruined! Since this was going under the sheet music, I just poked a hole in the bubble and mod-podged the shit out of it. I was much more careful with the sheet music piece of paper.

Now take your finished ART to get it framed. If you bought the frame from Hobby Lobby, they will frame it for FREE! I only had to pay $1.00 for the hanger wire. (Michael’s told me there was a fee for using their framing department, even if you bought the frame there.)  I picked a pretty extravagant frame for this, considering I’m usually a simple black-frame sort of gal, but I think it looks perfect with this. It will now hang proudly in our powder room, so any time someone is using our bathroom, they have a little reading material, and a great song is guaranteed to be stuck in their head while they are doing their business.

Materials list:

printed sheet music
canvas
Matte Mod Podge (I used almost the entire 16 oz jar)
newspaper, ripped into thin strips
sponge paint brush (I used one large and one small)
light colored paint (optional)
open-backed frame

I found this idea on Pinterest from Scout & Nimble.  If my instructions aren’t clear enough, be sure to check her website too.  Her wedding song was also a Van Morrison song, and she also has a son named Henry.  And now that I look at her site again, it looks like I bought the same frame as she did!  Imitation is the sincerest form of flattery, right?

Categories: DIY, Home | Tags: , | 4 Comments

Gorgonzola Flank Steak Sandwiches

Gorgonzola Flank Steak Sandwiches
Serves 4

Steak:
1 lb flank steak
1 glove garlic, minced
2 teaspoons olive oil
zest and juice of one lemon (you’ll use the juice for the aioli)
salt & pepper

Lemon Garlic Aioli
1/4 cup low-fat or light mayonnaise
1 clove garlic, minced
2 teaspoon rice vinegar
1 tablespoon lemon juice
1 teaspoon Dijon mustard
hot sauce, to taste

8 slices crusty bread
1/4 cup Gorgonzola cheese, crumbled
fresh baby spinach or arugula leaves
tomatoes, sliced

1. Season flank steak with salt and pepper.

2. Blend one clove garlic, olive oil and lemon zest in a small bowl and rub onto one side of the steak. Let it sit for up to 30 minutes, at room temperature.

3. Heat grill or grill pan over medium-high heat. Grill steaks to desired doneness (mine were about 5 minutes per side.) Remove from heat and let rest for 5 minutes before thinly slicing.

4. Meanwhile, combine all aioli ingredients (except hot sauce) in a food processor. Blend, then season with salt, pepper and hot sauce to taste.

5. (I completely missed this step, but I can imagine the melted gorgonzola would have been awesome.) Preheat the broiler. Drizzle each slice of bread with olive oil (if desired), place on a baking sheet and broil until toasted. Remove from oven and spread aioli on one side of each slice. Divide the streak and gorgonzola among 1/2 the bread slices. Return to the oven and broil until cheese melts. Divide spinach (or arugula) and tomatoes among the other 1/2 bread slices. Place the halves together to make sandwiches.

Results: Why are you still reading this? Seriously…run to the store and get the ingredients to make this tonight!

Are you ever so excited by a new recipe that you forget to actually pay attention to the recipe? That was me with this recipe. I was so ready to eat that I just ignored the recipe and started chowing down. I was half-way through my sandwich when I realized I forgot the gorgonzola. Then I realized I forgot to broil them! The sandwich was delicious without the cheese, but even better with it. (I never did get around to broiling it.) And that aioli? TO. DIE. FOR! I am so thankful that I have enough leftovers to have for a sandwich today. My *only* complaint was that the meat was very hard to chew. So if you are looking to impress your man or lady-friends by being a dainty eater, forget about it. You’ll have to rip this one apart like a dinosaur. This seriously might be the best sandwich I’ve ever had.

Recipe from Smith Bites. I did lighten down the list of ingredients and didn’t feel like I was missing a thing.

Categories: Food, Recipes, Uncategorized | Tags: , | Leave a comment

A valentine for us

Me (while emptying out Steven’s backpack): What’s this?


“I love you more than haircuts. Than school and Emily. And ice cream and candy. I love you more than Angry Birds. Than pie and Dylan and Kirby.”

Steven: Oh, that’s a valentine.
Me: For me? (I swear, there wasn’t a hint of desperation in my voice)
Steven: Well, it’s for all of you.
Me: It’s very sweet.
Steven: There are some things on there that aren’t true.
Me: There is something on here that you love more than me? (I swear there wasn’t a hint of distain in my voice)
Steven: A few things.
Me: And they are?
Steven: Dylan and Kirby. I love those things more than you.
Me: …

That’s right. My seven-year-old loves this guy more than me.

At least I rank higher than haircuts…

Categories: Family | Tags: | 1 Comment

Butternut Squash and Leek Soup

Butternut Squash and Leek Soup
serves 4 (unless it’s a main dish, then I would say it serves 2 with lunch-sized portions for leftovers)

1 tablespoon olive oil
1 tablespoon light butter
3 medium leeks, cleaned and sliced (white and light green parts only)
1 medium butternut squash, peeled and cut into 1 & 1/2-inch cubes
1 tablespoon herbes de provence (or any seasoning really, this is just what I used)
salt and pepper, to taste
2 cups vegetable stock
a good handful of fresh chives, very thinly sliced
creme fraiche (optional)

1. Heat oil and butter in a cast-iron pot over medium-high heat. Add squash and leeks and sauté (covered) for 10 minutes, stirring once, until vegetables have softened. Stir in herbes de provence, salt and pepper. Pour vegetable stock into pot. Lower heat and simmer (covered) for about 1 hour*, stirring occasionally.

2. Let soup cool for about 10 minutes. Working in batches, purée soup in a blender until smooth. You may need to add a bit more vegetable stock if your soup is too thick. Return puréed soup to pot. Stir in chives (leaving some aside for garnish) and simmer over low heat until heated through (about 5 minutes.)

*This cooking time is an estimate. I’m sure it could be finished in much less time, this is just what worked into my driving back and forth to pick up the kids from school schedule.

Garnish with a tablespoon creme fraiche and chives. Serve with crusty bread.

Results: I think this may be what heaven tastes like. Seriously. For realsies.

This recipe came from FrugalFeeding. The original recipe calls for a “large knob of butter” and “a good slug” of olive oil. Sounds pretty good, right? I lightened it down by using light butter and only a tablespoon of olive oil.

Categories: Food, Recipes | Tags: , | 3 Comments

Foil Packet Tilapia (aka Emily’s Tilapia)

Foil Packet Tilapia
serves 4

four tilapia fillets
2 lemons, thinly sliced
2 Roma tomatoes, sliced (whole grape or cherry tomatoes would work well too)
one sweet onion, sliced
bell peppers, sliced (I used green and orange)
two cloves garlic, chopped
salt & pepper to taste
1/4 cup white wine
olive oil cooking spray
8 oz angel hair pasta

1. Preheat oven to 375 degrees F. Spray four sheets of tin foil (big enough to wrap each tilapia. I imagine you could also put all the tilapia together in one packet.) with olive oil cooking spray. Divide the lemon slices between the sheets of foil. Season tilapia with salt and pepper and place tilapia on top of the lemons. Top each fillet with vegetables and sprinkle with garlic. Before sealing, pour about 1 tablespoon white wine in each packet. Seal tightly (I double-wrapped my packets, which was a good thing, because some of the liquid got out) and bake in oven for about 25-30 minutes.

2. While fish is cooking, prepare pasta.

3. Divide pasta among four dishes. Carefully transfer fish and vegetables onto pasta, being sure to pour any liquid over the pasta.

Results: Emily sent me this recipe because I had two bags of tilapia sitting in my freezer. (Yay! Only one bag to go now!) This was so simple to make and really delicious. Chris said he thought it looked like it was going to be pretty bland, but agreed that it was tasty. The liquid from the foil packets on the pasta was amazing. And the ONLY dirty dishes were the cutting board and the pasta pot! Gotta love easy clean-ups. Thank you, Emily, for sending this recipe!

Categories: Food, Recipes | Tags: , | 4 Comments

A sunset with wings

Henry: “Mom, can you do my hair for me?”
Me: “How do you want me to do it?”
Henry: “I want it to look like a sunset with wings.”
Me: ….

Me: “How’s that?”
Henry: “Perfect!”

Who knew?

Categories: Family | Tags: | 2 Comments

Valentine’s Day

This is Steven and his friend Anna. Apparently, these two have big plans for their future, including wedding bells. We’ve encouraged him to wait until he’s a little older, but in Steven’s words “Me and Anna are on the same page.”

They have been friends for a very long time. They met at a Kindermusik class when Steven was 9 months old and Anna was 4 months old. That’s Steven in the stripes, Anna in the yellow.


(I have to take this opportunity to thank my friend Holly for digging this picture up for me. That’s her daughter Macey in the green dress. After moving TWICE, Holly was able to find this picture in less than 24-hours. She must be way more organized than I am!)

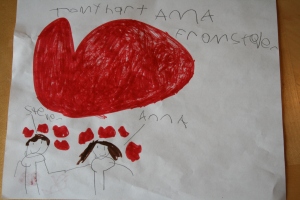
At school, Steven had a project to make a valentine card for someone special. I know, I know…you’d THINK that he’d make one for his awesome mom, but NO. He makes it for Anna instead. But how can I be bitter when it’s as sweet as this:

And in case you have trouble deciphering his handwriting: “To my hart Anna. From Steven. Anna, I love you a lot. I found another boy at school and his name is Dylan. Me and Dylan have a lot in common. Let’s get back to talking about us. I can not wait till summer so we can hang out in your pool. Love you, from Steven.”

Seriously, now! We have a sweet boy on our hands.

Categories: Family | 2 Comments

Pasta Moussaka

Pasta Moussaka
serves 6 (I think 6 servings of the sauce would be a stretch.)

1 onion, chopped
2 gloves garlic, minced
1 pound ground lamb
2 teaspoons dried oregano (I used 2 tablespoons fresh, because I had it)
1 teaspoon cinnamon
1/2 teaspoon nutmeg
1/2 teaspoon salt
1/4 teaspoon freshly ground black pepper
1/2 cup reduced-sodium chicken broth
1/3 cup fresh parsley, chopped
1/4 cup white wine
3 tablespoons tomato paste
12 oz linguine or fettuccine
2 tablespoons grated Parmesan cheese

1. Start a large pot of salted water boiling over high heat. Add pasta and cook until done. Drain and set aside.

2. Meanwhile, spray a large skillet with cooking spray and heat over medium heat. Add the onion and cook about 2 minutes. Add the garlic and cook, stirring, until fragrant, about 30 seconds. Add the ground lamb and heat until cooked through, about 3 minutes. Add the oregano, cinnamon, nutmeg, salt and pepper; cook until fragrant, about 15 seconds. Stir in the broth, parsley, wine and tomato paste; bring to a boil. Reduce heat to low and simmer, covered, about 10 minutes, stirring occasionally.

Serve sauce over pasta and sprinkle with Parmesan cheese.

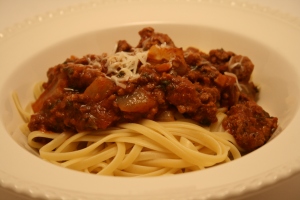
Results: Did this ever smell good! All those spices in the ground lamb were incredible. Don’t let the list of ingredients scare you off, most of them are spices you will likely have in your pantry. This was really delicious, and even Henry scarfed it down (although I did not tell him what kind of meat he was eating.) It’s pretty much a spaghetti sauce, but the lamb and spices just make it a bit different.

It was really easy to make (although I’m not going to give it the “super easy” tag, because it did require constant attention. Make sure you have everything chopped and pre-measured ahead of time to make this simpler to prepare.)

And, look at what my husband made for me:

It’s a light-box! It’s usually pitch-black by the time we eat dinner in the winter, so my pictures never come out as good as I want them to without using a flash, and I HATE using a flash because everything is too washed out. Hopefully now my pictures will be a little better. Or at least I won’t be able to blame anyone but myself. Thanks, Chris!

Recipe from Weight Watchers.

Categories: Recipes | Tags: , , | Leave a comment

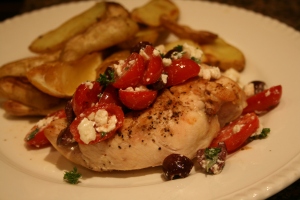
Greek Salsa Chicken

Greek Salsa Chicken
serves 4

Salsa:
2 ounces reduced-fat Feta cheese
1 cup grape tomatoes, halved
1/4 cup pitted kalamata olives, coarsely chopped
2 tablespoons fresh parsley, chopped
2 tablespoons lemon juice
2 teaspoons olive oil
1 tablespoon fresh oregano, chopped

1. In a medium bowl, combine all salsa ingredients. Cover and chill in refrigerator.

Chicken:
4 boneless, skinless chicken breast halves
salt and pepper to taste
1 teaspoon olive oil
1 lemon, cut into wedges

1. Preheat oven to 450 degrees F.

2. Heat 1 teaspoon olive oil in oven-safe skillet over medium-high heat. Season chicken with salt and pepper. Sear chicken, about 1-2 minutes each side; remove from heat.

3. Squeeze lemon wedges over chicken and tuck wedges around the chicken breasts. Roast until done, about 25 minutes.

Serve salsa over chicken. Served with roasted potatoes (which wasn’t a great side dish. I’d go with a Greek salad or orzo pasta next time.)

Results: I have been craving Greek food lately, so this recipe looked like a good way to get a fix. I did health up the original recipe a bit (used less olive oil and reduced-fat Feta instead) so check out the original recipe for a little more flavor. This was really delicious and so pretty! A great, colorful meal during the dreary weather we’ve been having lately. The cold leftovers were even better! It was also really simple to make, since most of the cooking is in the oven.

I found this recipe on Sweet Pea’s Kitchen.

Categories: Recipes | Tags: , , | Leave a comment

Tilapia Extravaganza!

Extravaganza! I hope you read that with a dramatic voice. Extravaganza!

Tilapia Extravaganza!
Serves 4

1 pound tilapia fillets
salt
pepper
garlic powder
2 tablespoons capers
4 cups fresh baby spinach
2 tablespoons reduced-fat mayonnaise
1 tablespoon honey
juice of one lemon
angel hair pasta (rice would be good too)

1. Preheat oven to 375 degrees F. Place tilapia on two large sheets of parchment paper (large enough to wrap the tilapia). Season tilapia with salt, pepper and garlic powder, to taste. Sprinkle capers on top of tilapia and mound 1 cup of spinach on each fillet. Wrap fish tightly in parchment paper, place on a baking sheet and bake for about 20 minutes.

2. Meanwhile, to make sauce, mix together mayonnaise, honey, lemon juice and a pinch of salt in small bowl.

3. Prepare pasta.

Serve tilapia over pasta and drizzle with the mayonnaise sauce.

Results: Sounds weird, doesn’t it? I’m not sure what it was that attracted me to this recipe, since there was no picture that went with it, and I’m all about the food porn. I think part of it was that after recently cleaning out my freezer, I discovered that I had TWO bags of tilapia that needed to be eaten, so I’ve been hunting for tilapia recipes lately. But I imagine the biggest part was the title. TILAPIA EXTRAVAGANZA!!!! How could I not try it?

Seriously, this was really tasty! The capers and spinach add such a nice flavor to this otherwise boring fish. And though I was skeptical, the mayonnaise sauce had a really sweet tang to it. I would eat this again tonight! This was also super easy to make. Hardly any dishes were dirtied and no chopping is required.

This is another community recipe from Weight Watchers.

Categories: Recipes | Tags: , , , | 2 Comments

Create a free website or blog at WordPress.com.